Changelog
Follow up on the latest improvements and updates.
RSS

Enhance the customer booking experience with
expanded staff bios
on the one-on-one selection page.👤 Customers can now view
complete staff profiles
, offering greater transparency and confidence in their choices.🌐 External links (LinkedIn, websites, etc.) provide easy access to additional information.
Ensure customers have all the details they need before making a booking!

Streamline your subscription management—no more manual tracking or reminders. Now you can easily
schedule cancellations
directly from your dashboard.Head to the
Subscriptions
tab, click End
, and choose to either:- Cancel immediately, or
- Select a custom cancellation datefrom the calendar.
🗓️ You’ll have full control with a clear option to undo cancellations anytime using the
Don’t cancel
button.Efficient subscription management, simplified.

You can now issue
credit notes
to efficiently manage billing corrections—whether due to canceled classes, duplicate charges, or other errors. This allows you to update invoices without manual edits, maintaining both accuracy and transparency. 🔄 To create a credit note, go to
Billing
→ Credit notes
, and click on Add credit note
. You can adjust the reason, amount, and how the credit is applied—either to the customer’s balance or as a refund.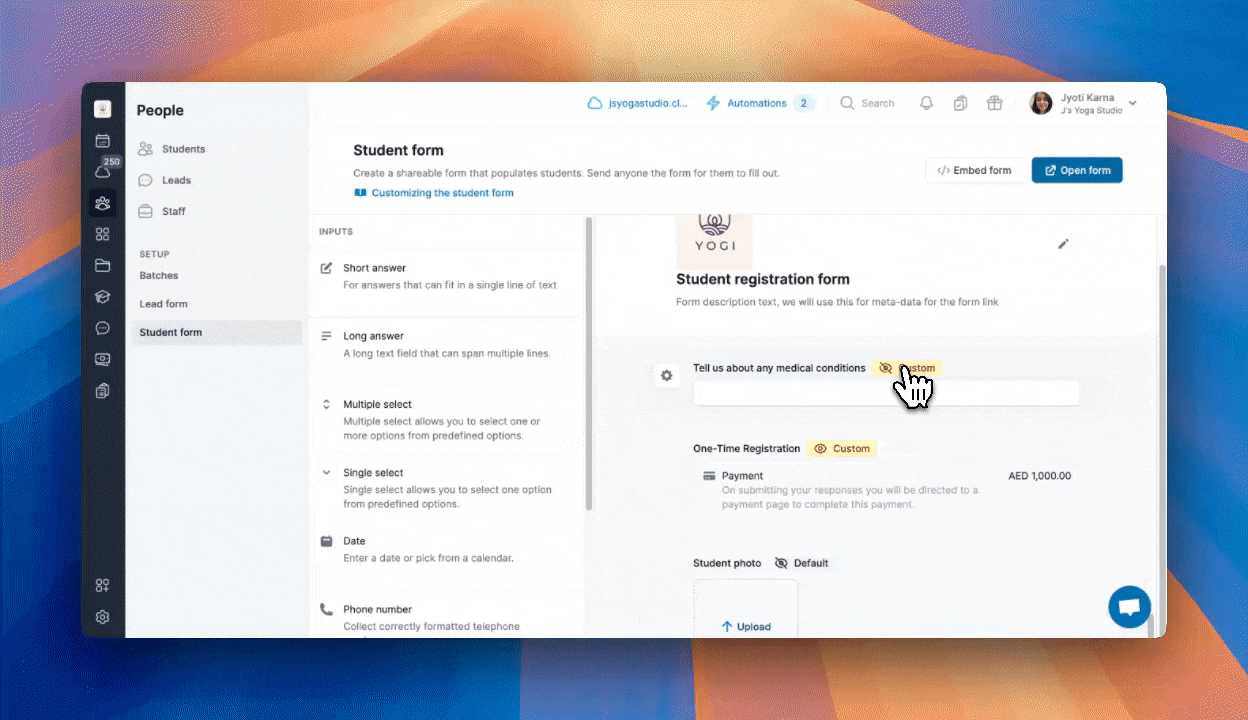
You can now configure your student forms to show specific custom questions based on the booking type — including
Class, One-on-one, Package, Course, Rental
, or a shared form link
.The new
“Visible on forms”
setting allows you to control when each question is shown, ensuring a more relevant and streamlined experience for your customers.👉 Explore more on how to customize student form.

You can now merge duplicate or outdated lead profiles directly from your dashboard — just like with student profiles. Your lead data stays clean, accurate, and easy to manage.
Go to
People > Leads
, click the three-dot menu
next to a lead, and select Merge
. Choose the duplicate profile, confirm the primary one, and click Save
.The duplicate profile will be deleted, and all data will be transferred to the primary profile.
👉 Learn how to merge lead profiles.

We’ve introduced a few updates to enhance your scheduling experience:
👩🏫 When you switch to
Staff view
on the calendar, each class will now show its Location
right on the session bubble—so you know where it’s happening at a glance.📍When you switch to
Location view
, you’ll see the assigned Staff member
on each class—so you know who’s taking it without extra clicks.🔍 If you’re unable to see staff names on scheduled classes, try
increasing the calendar’s zoom level
(clicking the ⚙️ cog icon) for improved visibility.🌫️ Additionally,
past classes now appear with a subtle fading effect
, helping you easily distinguish completed sessions from upcoming ones.👉 View your calendar now and experience the new changes in action.

Take control of your lead management with
Lead Segments!
Filter and
save custom views
based on pipeline stages, interest levels, lead owners, recent trials, and answers to default or custom lead form questions
.Your saved segments update automatically — helping you stay organized without the extra effort. 👥
Head to the
People
menu, go to the Leads
tab, and click the funnel icon 🌪️ to start saving your views.👉 Learn how to create lead segments.

The Classcard Staff App just got a refresh—now available on both
iOS and Android
with improved performance and new features to make day-to-day management even easier. ⚙️One of the most requested updates is now live: you can
record payments directly from the app
, no laptop needed. We’ve also made the app faster
and smoother
to navigate, whether you’re managing schedules, marking attendance, updating student profiles, or tracking invoices. 💳📲
Update or download now
:new
improved
Add More Add-Ons, Effortlessly ➕
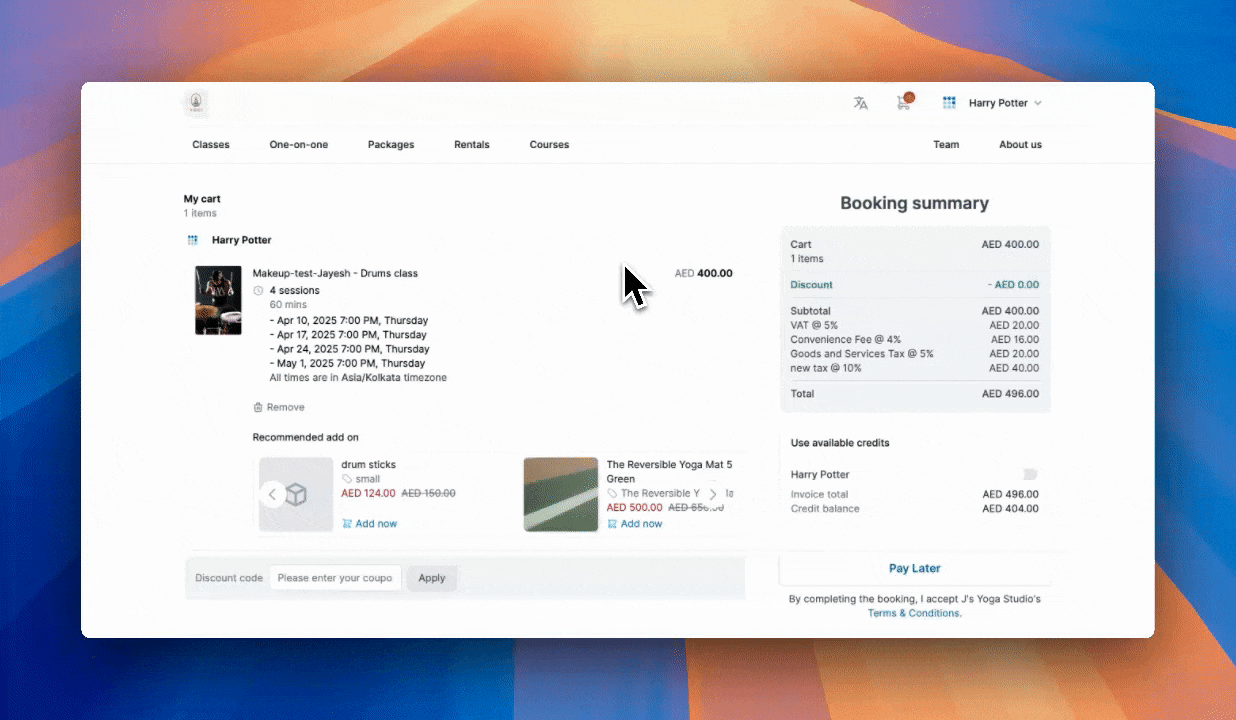
No more adding items one by one! Customers can now purchase multiple units of an add-on product in one smooth checkout. 🛍️✨
They can simply use the plus/minus icons to increase or decrease the quantity of an add-on while booking a service on the online booking page.
Learn how to use product add-ons.

Your online booking page is now available in Chinese! ✨ Delight your Chinese-speaking customers with a smooth, native-language booking experience from start to finish.
To set Chinese (Simplified or Traditional) as the default language for your booking page, head to
Online Bookings > Preferences > Default language.
Customers can now browse and book services in their preferred language!Learn how to make Chinese the default language for your booking page!
Load More
→